Showing posts with label lighting. Show all posts

Friday, August 3, 2012

DIY Mason Jar Luminaries

Yet again I bring you a project featuring shabby chic staples: burlap and lace!

A couple weeks ago, I bought two small shelves at an antique store, and I’ve been looking for something to set on them. I’ve got an abundance of mason jars laying around and of course some leftover burlap and lace from my Lamps on a String. So, I put the three together and made these babies! These would be cute for an outdoor event like a wedding reception; they’re romantic yet rustic. Or, you could use them as decoration on a table or shelf- like me! And, let me add, they are so easy. They probably took me 30 minutes total.

Supplies Needed:
mason jar/jars- mine were $1 each from the Dollar Store
lace fabric
burlap
twine or any sort of ribbon
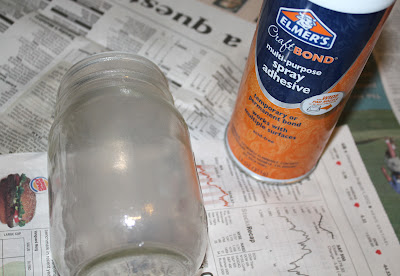
glue (I used Elmer’s Craft Bond Multi-Purpose Spray Adhesive)
scissors
tea light/lights

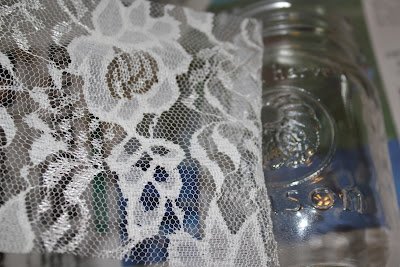
Cut out lace to wrap around the base of your mason jar.
Spray one side of your jar and attach your lace. Keep spraying and attaching piece by piece until your ends of lace meet. Press down the edges to ensure they will lay down flat.
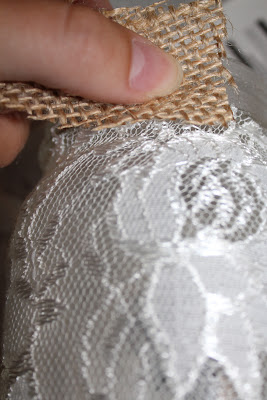
Now cut a strip of burlap the size of your rim. Spray your rim with glue and attach the burlap. I cut my burlap a little big and cut the extra off the top after I glued.
Tie your twine around the rim, and stick a tea light in. And viola! Your own mason jar luminaries.

 -A

Friday, July 20, 2012

Lamps on a .String


Another DIY post! I know, I know -- I’m addicted. Also, I’ve been itching to use my leftover burlap and lace from my distressed window shelf. Well, I found the perfect project! I saw a similar idea on pinterest, but I’ve added my own touch. :) I plan on hanging this cute little strand of lamps over my bed when I move into my apartment. I truly believe a room can never have too much light. This craft is simple and inexpensive. All you need is a pack of plastic cups, some fabric, fabric glue (I used the same Elmer’s Craft Bond Multi-Purpose Spray Adhesive as I used in my last post), scissors, and a strand of white Christmas lights (I actually found a 70 pack of white lights in the Wedding section at Hobby Lobby).
1. Roll your plastic cup on a piece of paper and trace a pattern. Cut out your pattern. You might want to make your pattern just a tad bigger than your actual cup, because it’s easy to trim later.
2. Pin your pattern to your fabric, and cut out as many pieces of fabric as you’d like there to be lamps. I made 16 lamps.
3. Using a knife or the tip of your scissors, poke 2 holes in the top of your cups- one hole on each side. Now cut 2 ‘D’ shapes in the top of your cups, leaving one strip across the middle.
5. Now that your cups are ready and your fabric is cut, all you have to do is glue the fabric to your cups. I sprayed one section at a time, neatly pressing each section down to reduce bubbling fabric.
6. Since I made my patterns a tad bigger than they had to be, I trimmed all my cups after I had glued the fabric on. I found that to be easier than trying to have an exact pattern.
7. Now, just string your new lamps on your string of lights. And there you are -- a new string of lights for any room!


-A