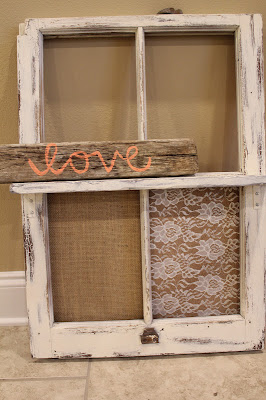
I recently bought an old window frame from an antique thrift
store, and I had been contemplating what to do with it. I picked up two of my
favorite fabrics- burlap and lace- and got to work. I ended up covering
corkboard in my fabrics for the bottom two squares and creating a shelf for the
upper two. I had to completely re-do my window frame and create a shelf that
matched, so this DIY requires a few steps. But...the finished product
is SO worth it!
Supplies Needed:
an old window frame
an old rag
spray paint of your choice (mine is called ‘heirloom white’)
sandpaper
painter’s tape (if you’ll need to cover any hardware)
corkboard to cover your bottom 2 squares (I bought a 12x24" roll at Hobby Lobby for $4.99)
measuring tape
a square of lace to cover one square
a square of burlap to cover one square
a large piece of cardboard (I used an old box)
fabric glue (I used Elmer’s Craft Bond Multi-Purpose Spray Adhesive)
a staple gun
a pencil
Two 2" L brackets and 8 screws
a power drill (you could use a plain screwdriver)
a level (unless you’ve got a really good eye!)
(***The next few supplies could be omitted if you already
had a piece of distressed wood that would work for your shelf. In my case, I
had to create one….)
*a piece of wood for your shelf (I got a 10 ft. 1x4" of oak at Home
Depot for less than $2)
*a power saw (or a normal saw- unless your wood is the exact
length!)
*apple cider vinegar
*a piece or 2 of steel wool (0-2 grade works nice)
*random tools to beat your piece of wood (hammer,
screwdriver, etc)
(*If you’re creating your own distressed wood for the shelf,
go ahead and place your steel wool in a bowl of apple cider vinegar to be
soaking).
Wipe down your window with an old wet rag, removing excess
dust or dirt.
Sand your window using medium grit sandpaper followed by
fine grit sandpaper.
Wipe down window again with a wet rag followed by a dry one.
Allow window to dry.
Tape off any hardware you don’t want painted on your window.
Spray paint entire window with an even coat. Allow window to dry.
While you’re waiting, you can spray paint your L brackets
the same color. I hung mine on dental floss to spray them- ha!
Rub edges, corners, and any other places you wish to look
distressed with medium grit sandpaper until you’ve achieved your ideal
distressed look.
Now measure the bottom two squares of your window, and cut
your corkboard. I made my
corkboard squares about a ½ inch wider than the actual window squares. Be
careful cutting the corkboard- it will break!
Cut a square of lace and a square of burlap to cover your
corkboard. Make sure and leave about an inch and a half on each side to wrap
around the back of the corkboard.
Spray one piece of corkboard with fabric glue and attach the
lace. I used my bottle of fabric glue as a rolling pin to flatten my fabric to the corkboard. Attach your burlap on the other piece of corkboard.
Flip both pieces of corkboard over on their backs. Spraying
each side with fabric glue one at a time, fold your fabric over and attach them
so that all edges are covered.
Now cut a piece of cardboard that is the exact size of the
bottom half of your window (from the middle window pane down). You’re going to
attach your corkboard squares to this cardboard.
Place the window on top of your cardboard and mark where
your corkboard squares need to go with a pencil/pen.
Slide your cardboard out from under your window, and attach
your corkboard squares using fabric glue.
Now place your cardboard back under the window, making sure
your new corkboard squares are lined up. Carefully hold your cardboard in place
and flip the window over, so its back is facing up. Using a staple gun, staple
the cardboard to the edges of your frame.
***Next are the steps for creating your distressed wood
shelf, so skip these if you already have a piece of distressed wood!
Measure the width of your window where you want your shelf
to go. Using a power saw, cut your piece of wood the length of your window.
Take your piece of wood outside with a few random tools, and
have at it! Beat it up, so it looks nice and old. Below are some strategies I
used to distress mine.
Sand the piece of wood to make the new rough spots even.
Dust the wood off with a rag.
Now, take the pieces of steel wool that have been soaking in
apple cider vinegar, and wipe down your piece of wood. Scrub the vinegar into
the wood as best you can. I did this for about 10 minutes.
Let the piece of wood dry (for an hour or two). You’ll
notice it turns dark, looking nice and vintage!
Spray paint the piece of wood with the same paint used for
your window. Let it dry. Similar to how you distressed your window with sandpaper, distress the wood. Dust it off, and it’s ready to attach!
Take your piece of distressed wood, and line it up on your
window frame. Use a level to make sure it’s flat.
Hold your L
brackets under the piece of wood and make a mark in each hole with a pencil (4
will be on your piece of wood, and 4 will be on your window). You might need an
extra pair of hands for this part!
(If you have a power drill) Using a small drill bit, create
pilot holes for your screws.
Using a power drill or screwdriver, screw your L brackets
into the PIECE OF WOOD FIRST.
Then, screw the L brackets into your frame.
And- voila! A vintage window frame shelf of your own! I
placed my newly made
mason jar craft on mine!
-A


